Saturday, 6 February 2016

Graffiti....

Graffiti anyone? Of course not I hear you exclaim! I would never do that...... but look I did .....gasp


OK not in real life, well yes in real life, but not on public property. I did graffiti on a card, such a rebel I know lol. A plethora of these cards  are on pinterest. I saw one on Julie's fabulous  blog, Julie's Japes. Click on her name to see Julie's cool card. I saved this idea in my brain, I know amazing that I even remembered lol. And tada here is one I whipped up this morning. All stamps, inks and paper are from Stampin'  Up  as well as the embossing folder. It's a little hard to see in the photo but it's a brick wall pattern, which just lends itself so well to this style of card.

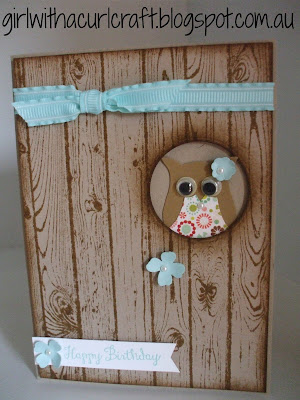
My gorgeous girl has a teenage birthday party to attend today for a friend of hers. I made two cards as I wasn't sure which one my girl would like for her friend. Here is the second card, which is my personal fave and the one my girl chose in the end. Initially  she was going with the graffiti style one as I had not completed the second card when she wandered into the study.


 Isn't it cute? I love it, I did say it was my fave. I love how the little owls face is peeking through the hole in the tree.  Again all stamps, ink, card stock, punches and ribbon are from Stampin' Up, the patterned paper is a scrap of something very old from my stash. The joggly eyes are from a craft store. I saw this gorgeous card again on pinterest and basically copied it with a couple of variations. It was too cute not to do my own one. Thanks to Krista for the card she made. If you click on Krista's name it will take you to her blog to see her original card.
Here are a couple more photos for you to see of the owl card.


As you can see from the last photo I just popped the wood paneled piece up on foam tape to give it a bit of dimension. It also made it easier to insert the owl after I attached the wood paneled piece to the card first.By putting the owl in last she (yes it's a girly owl) is always perfectly placed.

So which is your fave?
Have a superb day.
Cheers Donna :)

Monday, 1 February 2016

Our Bumper Crop....Not!

Finally, finally, finally, we have  picked something form our vegie patch! It's only the first of February and we planted our seedlings way back in October. I know it's ages ago and we are at a loss as to why it's taken so long for anything to grow. We have had plenty of sunshine, we've watered them regularly from our water tank, we've weeded, we prepared our beds before we planted the seedlings....so why so long? Who knows. The corn well it grew ears of corn, I was excited but as it's been so hot they have not fared well. Here is what was harvested today.


                                           Two  cucumbers and two  zucchinis!

Here are some more things still growing and almost ready to pick.

                                                                      A cucumber......


                                                                     A zucchini......


A pumpkin.......


No we did not plant a bread tree in our garden nor did we find this growing wildly in our garden!
I made this beauty today instead of buying bread from the bakery. It's just a good old white loaf of bread.  I'm sure it will be delicious with  some  lovely plum jam I made yesterday. 


Hoping your day is marvellous.
Cheers Donna

Sunday, 31 January 2016

Plum, Plums, Plums....plum jam, plum crumble & oh yeah banana cake!

A plethora of plums or maybe a glut of plums found themselves marooned in my kitchen on the bench yesterday. My father in law picked these beauties from his tree and kindly delivered four bags to our house.


What to do, what to do....? Plum jam anyone? Yes please was the resounding reply from the family. I hunted down a recipe from taste.com.au  I read all the reviews and decided that this was the easiest recipe for me to make. You see I've never made jam before ever. I have pickled beetroot and made lemon butter but never made jam. How hard can it be? I've always been put off thinking it was hard.  Well I'm here to inform you it's not hard at all. I found the recipe easy to follow. I used only one kg of sugar instead of the amount in the recipe after reading the reviews.


Here are some of the plums washed and waiting to be chopped.


Cooking on the stove!


All bottled up.......yes twelve and half jars. After I made one batch and it worked out so well I made another batch, well I had all these jars to fill you see....


That was two bags of plums down two more to go. I needed culinary inspiration. Off to the computer and a visit to Lorraine from a fabulous blog I like   Not Quite Nigella  .   What do you know a recipe, plum and pear crumble. Click on the highlighted writing and it will take you to the the recipe and Lorraine's delicious blog. Well mine is minus the pear but I decided that I could live with that. I mean we didn't have  pears anyway.


How delicious does that look? I absolutely love apple crumble so I thought why not plum crumble.

Now when you eat apple crumble you just have to have it with vanilla ice cream. This is just my opinion! So it makes sense that plum crumble and ice cream would be equally delicious. Minor disaster, no disaster  of epic proportions, we were out of ice cream! Luckily I discovered this before the plum crumble went into the oven. I promptly dispatched hubby and my beautiful girl to purchase said ice cream....crisis averted. A bit hard to see vanilla ice cream in a white bowl, but trust me it's there. Oh My Goodness this was so yummy. My mouth is watering just looking at the pictures. What a shame there is half left, we'll just have to have it again tomorrow night, such a hard ship, how will we ever cope? lol


So that's three bags of plums gone, one left. Well that one bag can wait until tomorrow.  I think I'll make up some more of the stewed plums for plum crumble and freeze it in portions.....that way we get to enjoy a few more plum crumbles.......lucky us!!!!! My hubby wants me to make up more jam, um no I will not. Plum crumble is a winner.

And just because I can, well more to the point because we had  six bananas that were looking "a bit thanks for coming" two banana cakes were whipped up. Not to mention we needed some snacks for lunch boxes and to have with a cuppa for morning tea.


So what did you get up to this fine day?
Have a tremendous day.
Cheers Donna

Tuesday, 26 January 2016

Anyone for Chocolate?

Hello there, come see what I've made.......


Isn't this just the cutest little box? I happen to think it is. I have actually made 16 of these gorgeous little things. It measures roughly 7cm (2 3/4 ") across, 3cm (1 6/16 ths ") high, that's just the bottom section where your goodies would go, I hope that makes sense to you? The whole box is roughly 6.5 cm (2 1/2 ") high. The depth is 3.5cm ( 1 1/2 "). Pinterest once again offered up inspiration, well actually a tutorial on how to make these. A lovely lady called Teri has a video tutorial and all the details on how to make these over on her blog , Teri's Craft Spot. Just click on her name to go to her tutorial. You can make two of these boxes from one piece of A4 card stock, so very economical.

Look what fits inside...... 


Yummy two Ferrero Rocher chocolates! They fit perfectly inside the box. Wouldn't these be great as a party favour or dinner party treat on your table? I have actually made them as Easter treats, to give to all the lovely people who work at the local bakery I buy my bread from. I think it's nice to reward those who we interact with at the shops.They don't expect it so it's a lovely surprise. I know the boxes don't look particularly "Eastery" but the sentiment "sweet moments" ( from Stampin' Up's  project Life Remember This stamp set)lends itself to a sweet treat of chocolate. Instead of the Ferrero's you could put in a few mini Easter eggs. I think these would also make nice Valentine treats too.


 All materials and stamp sets used are from Stampin ' Up. Some of it is retired stock. The stamp sets are Project Life Remember This and Amazing Birthday.

Have a wonderful day. 
Cheers Donna 

Monday, 25 January 2016

Roses are red......

Roses are red......spoiler alert, this is not a Valentines post! How are you all this fine Monday?
I have been busy making these gorgeous little felt roses that just happen to be red. Take a look, aren't they cute?  I think they are and hopefully the recipients do too.


These are so gorgeous and look even better IRL (in real life). I made quite a few of these last year or maybe even the year before for my mum. My mum belongs to a group of ladies from her church who get together to craft and chat and other such activities. They even have a name for their group, "The Rubies." I thought it would be nice if they could all have a brooch to show they belonged to this auspicious group, so whipped up quite a few of these brooches as mentioned earlier.  Mum reported back that the ladies were chuffed and really loved them.
Anywhoo, mum mentioned last year that more ladies had joined and had asked where had they got the brooches from. I asked mum if she wanted me to whip up a few more. A few more turned into 12 more! Not a problem I thought, but then ran out of time last year with work and life. Well as I'm on holidays and just lazing about the house, I thought I  had better pull my finger out and make them!

  The roses start out as 2 spirals cut using  a spiral die and a big shot.  A fine line of glue placed  on the straight edge and then  wind the spiral up tight. Wind one spiral first then glue and wind the second spiral onto the first. When finished add a brooch pin underneath the final loop.


I made a tag and stamped some leaves and then punched two holes so I could then attach the rose.


Then all I had to do was package them up so they look pretty and post them to my mum. Hopefully the ladies will be surprised. Fingers crossed they love them.


Here are all 12 of them packaged up and ready to go.
 Wouldn't these look pretty in other colours? My favourite colour rose is orange what's yours?

That's all from me have a marvellous Monday. Cheers Donna

PS I forgot to say the spiral  flower die, stamped image- Bloom of Hope and scalloped tag topper  punch are all from Stampin' Up. I am not a demo.

Thursday, 21 January 2016

Valentines Day Anyone.....

Love is in the air! Valentines Day is just around the corner for those of you that get all excited and exchange gifts and cards.  When my husband I were first dating I got very excited when our first Valentines day together rolled around as I had never  been the recipient of a Valentine gift ever....well  lets just say it didn't happen. Awww I hear you say, please don't be sad for me it's all good, NOW! I happened to have met a fantastic guy that just didn't believe in Valentines day. If truth be told I was sad and quite disappointed at the time. But I have come to realize as time has gone by that Valentines day is just another day in the year. I have married a great guy who loves me, treats me and our kids well, provides for us and even surprises me with flowers or a night off from cooking or some other surprise at other times during the year. I like to think that I have Valentines day surprises dotted throughout the year, as opposed to one day a year. You gotta love that.

Anyway, you are here to see what I have made not here for my ramblings, so lets  get on with the show and tell.

The lovely Angie from Chic n Scratch has a great video tutorial on how to make these gorgeous boxes on her blog. Click on her name to see her tutorial. I followed her tutorial exactly and "ta da, bada bing bada boom" 16 boxes were easily whipped up quick smart. I used different coloured card stock and designer series paper (dsp) than Angie. I had nothing Valentine related nothing with hearts, so I went with a fresh looking print. I quite like the look. These little treat boxes could be made for any time of the year, even as birthday or wedding favours. All  materials used are  from my stash of crafty stuff, this lot happens to be all from Stampin 'Up, some of it is retired stock.

I have made these for our family Valentines dinner. I know I said my husband doesn't believe in Valentines day, I never said I didn't lol! Every year we have a candle lit dinner for four, hubby, me and our two kids! I always set the table extra special, candles, wine glasses the works. We have a special dinner and yummy dessert. We don't  normally have dessert, so it's a real treat. On the table I always have a small chocolate treat. Yes inside these boxes are three small heart shaped chocolates. Here's a picture of the inside of the box and one where you can see how the box closes.


Here are a couple of more shots.Three of the boxes feature the same dsp and then there is a rogue box with a different dsp!


What do you do for Valentines day as a family? Do you make little treats for your kids?
I hope you have a go at making some of these cute boxes.

FYI yes I did say I have made 16 of these boxes and yet there is a candlelit dinner for 4! I have made extra to give to my mum and step dad, and some of my dear friends.

Have a magnificent day.
Cheers Donna


Wednesday, 20 January 2016

Black Finger Nails, Red Wine......

Great song by Eskimo Joe, Black Fingernails, Red Wine.....but there are no black fingernails or black nail polish anywhere in this post at all. There is nail polish though, although not real nail polish. Oh my goodness are you confused yet or ready to skip to the next blog?

Take a look at this then.......


Now I think this is cute, 3 little bottles of nail polish with the middle one popped on foam tape to give it dimension.  When I proudly showed my daughter and husband they both said...."mmmmm  very nice". Imagine this being said with a vague tone to their voices. They clearly had no idea what those things were at the top of the card . I admit I was a bit deflated by their lack of recognition. Of course when I told them nail polish they both said, "oh yeah". I have made this for my most beautiful niece who turns 19 on the 19th of this month. Obviously I waited until after her birthday to show you, as she told me she would be my # 1Fangirl when I first told her I was starting a blog.

I once again got my inspiration from Pinterest , gotta love that site!. I was inspired by Rhonda's card. Click on her name to see her card. I loved how she had made the lids from the modern label punch from Stampin'Up and the bottle itself from the owl builder punch also from SU. As you can see I used the same punches to make my gorgeous bottles of nail polish but the layout of the card is different.

I don't actually own any nail polish myself. My lovely daughter does, in fact she  has way too many bottles to count lol!. My nails are terrible they are very soft and peel all the time. They have always been like this. It is not a calcium deficiency it's just how they are. I have had my own nails manicured a few times over the years and they look nice for a day then just terrible. A few years back I decided to get gel nails. They looked amazing and I felt like such a lady, very elegant and a wee bit posh even. They were great for 2 weeks, but then I had to go back to the nail salon and ask for them to be removed. You see   as my own nails grew the length of the gel nails got longer, not a big problem you may think. As a person who was wearing contact lenses full time it was a nightmare. I kept  poking my eyes out every night when I removed my lenses. Not to mention that when the gel nails came off my own nails were even softer than before. So for me I just keep it real, it's just too hard for me to bother with. I admire anyone that has lovely nails, real or otherwise. Are you one of those lucky people that has gorgeous nails? Hats off to you if you are.

Have a fantastical day.
Cheers Donna